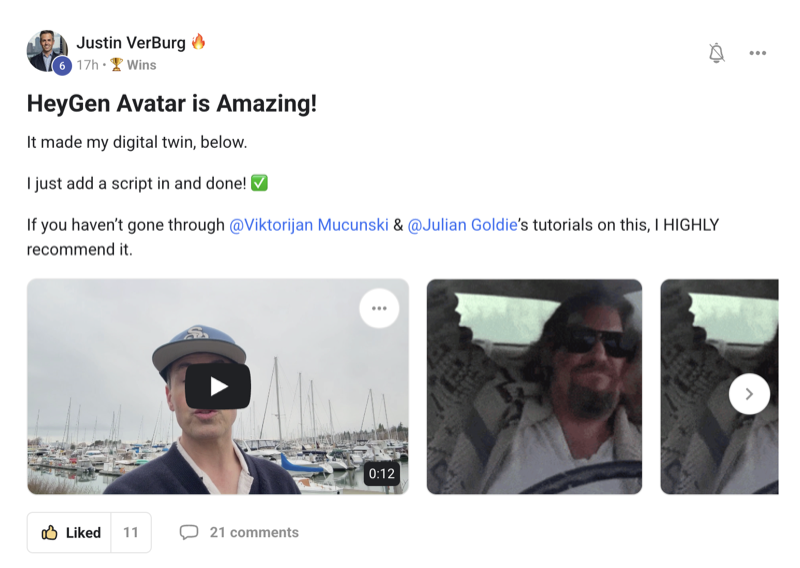
ChatGPT Workspace Agents just dropped and I've already built my first daily SEO writer.
It researches AI news every morning.
It drafts a full SEO article.
It publishes while I'm still asleep.
Total setup time: under 10 minutes.
Zero code.
Zero scripts.
If you've been looking for a way to run a content engine on autopilot without n8n, Zapier or Python, this is the update you've been waiting for.
Here's the full walkthrough.
ChatGPT Workspace Agents — What You Need Before You Start
You need a business, enterprise, edu or teacher plan on ChatGPT.
Not a personal plan.
Not a Pro plan.
The feature is free until May 6th on eligible plans, so now is the time to test it.
You also need to know roughly what you want your agent to do.
For this walkthrough I'm building an AI news SEO writer that runs daily.
Step 1: Open the AI Agents Section
Log into ChatGPT on your business account.
Look at the left sidebar.
You'll see a new section called AI agents.
Click it.
You'll see three tabs.
- Team directory — agents other people on your team built
- Built by me — your agents
- Templates — 5 ready-made starting points
Click Built by me.
Click New agent.
Step 2: Describe the Agent in Plain English
Here's the magic.
You don't fill in forms.
You don't pick dropdowns.
You type a sentence.
For my SEO writer I typed:
"Research the latest AI news every day and create an SEO blog post in my writing style."
That's it.
ChatGPT then generates the full agent plan.
Step 3: Review the Generated Agent Plan
The plan includes:
- Name: AI news SEO writer (you can edit this)
- Channels: ChatGPT and Slack
- Capabilities: research, summarise, draft
- Skills: SEO writing, editorial judgement
- Files: empty — you'll add these in a sec
- Memory: empty — you'll add these too
- Emoji icon: auto-generated
You can accept the plan as-is or tweak anything.
I renamed mine to SEO Writer v1.
Get my exact agent prompts inside AI Profit Boardroom →
Step 4: Add Your Files and Memory
This is where the magic actually happens.
A generic agent will produce generic output.
A trained agent produces content in your voice.
Upload:
- 3-5 of your best articles as examples
- Your brand style guide if you have one
- Your keyword list or content pillars
In the memory section, add:
- Your target audience
- Your tone (for me: Hormozi, UK grammar, sentence-per-line)
- Your CTA rules
- Your internal link strategy
The more memory you give it, the less editing you'll do later.
Step 5: Write the Agent Brief
The agent brief is the instruction set that runs every day.
For my SEO writer mine looks like this:
Role: Senior SEO writer for Julian Goldie's AI automation blog.
Daily workflow: At 6am UTC, research the top 3 AI news stories from the last 24 hours focused on AI agents, ChatGPT, Claude and automation. Select the most relevant for my audience of solo operators and small teams. Draft a 1500-2200 word SEO-optimised blog post.
Topic selection rules: Must be news-worthy, must relate to AI agents or AI automation, must not be a duplicate of content I've published in the last 30 days.
Output format: Markdown with frontmatter. Sentence-per-line. H2 sections. 6-question FAQ. 2 internal links. 2 CTAs to my Skool community.
Safety: No unverified claims. No financial advice. No medical claims.
SEO guidance: Target keyword in title, H1, first paragraph, meta description, 3-5 H2s. Keyword density 1-2%.
Every part of this brief is editable inside the agent settings.
Step 6: Connect Your Apps
The SEO writer needs to publish somewhere.
Click Apps and connect:
- Google Drive — for draft storage
- Notion — for my editorial calendar
- Gmail — for sending me the daily digest
- Wix — for publishing (if you're on Wix; WordPress isn't native yet but you can set up a custom connection)
Each app asks for OAuth permissions.
Takes 30 seconds per app.
Step 7: Schedule the Daily Run
This is the feature that makes workspace agents different from custom GPTs.
Click Schedule.
Click Add new schedule.
Set the time: for me 6am UTC so I wake up to a draft.
Set the frequency: daily.
You can add multiple schedules if you want different runs on different days.
You can also edit existing schedules, run a preview before going live, or delete a schedule.
Always run the preview first.
Always.
It catches 80% of the bugs before they ship.
Step 8: Test the Agent Live
The agent builder has a split screen.
Left side: the design panel where you edit everything.
Right side: a live chat where you can talk to the agent.
Ask it: "Draft tomorrow's article now as a preview."
Watch it run.
Review the output.
Iterate the brief until the output is 90% of what you'd write yourself.
That last 10% is your editorial polish.
Join AI Profit Boardroom to see my live agent demos in the 4 weekly coaching calls →
Step 9: Ship It
Once the preview output is solid, turn the schedule on.
The agent now runs every day at 6am UTC.
You wake up to a draft in your Gmail and Google Drive.
You spend 10-15 minutes editing.
You publish.
That's a full content pipeline in under 10 minutes of daily human time.
ChatGPT Workspace Agents Scheduling Tips
Tip 1: Schedule the research at 5:30am and the drafting at 6am. Splitting the tasks means each agent does one thing well.
Tip 2: Add a Friday-only schedule for a weekly recap article. Different frequencies for different outputs.
Tip 3: Use @-mentions between agents so the research agent hands off to the writer agent automatically.
Tip 4: Turn on approval gates for anything that publishes externally. An agent can draft and save, a human hits publish.
Tip 5: Check the audit logs weekly. You'll spot patterns — the agent avoiding certain topics, always picking certain sources — and you can tune the brief.
Apps You Can Connect
Full current list:
- Google Drive
- HubSpot
- Notion
- GitHub
- Gmail
- Google Sheets
- Wix
- Slack
WordPress is coming via custom connection only for now.
ChatGPT Workspace Agents Setup Mistakes
Mistake 1: Vague instructions. "Write a blog post" is not enough. Be specific about word count, format, tone, target keyword.
Mistake 2: No example files. The agent has no idea how you write unless you show it.
Mistake 3: Scheduling before preview. Always preview first.
Mistake 4: Over-complicating. Start with one agent, one schedule, one output. Scale later.
Mistake 5: Ignoring memory. Memory is where your brand voice lives. Fill it properly.
Related Reading
FAQ
Q: How long does it take to set up a ChatGPT workspace agent?
Under 10 minutes for a basic agent. Add memory, files and app connections and you're at 20-30 minutes for a production-ready agent.
Q: Can I schedule a workspace agent to run multiple times a day?
Yes. You can add as many schedules as you want. Daily, multiple times a day, different times on different days.
Q: What happens if the scheduled agent fails?
The audit log captures the failure. You get notified in Slack or ChatGPT. Fix the brief and re-run the preview.
Q: Can ChatGPT workspace agents publish directly to WordPress?
Not natively. You'd need a custom connection. Google Drive, Notion, Gmail, HubSpot, GitHub, Wix and Sheets are native.
Q: Do I need to write any code for the setup?
No code at all. Everything is described in plain English inside the agent builder.
Q: Can I test an agent before scheduling it?
Yes. The builder has a live chat on the right side where you can run the agent manually before turning the schedule on.